Improvements - A Swim Platform
This spring we did some major work on our Riviera. The boat is primarily used
for water sports and is left in the water all summer long. Between the UV exposure
and the constant climbing over the hull, the varnish finish had taken a beating.
This lead to completely refinishing the deck and sides of the boat. We also
wanted to enhance its use for wake boarding, skiing and tubing. For this we
added a wakeboard pylon and swim platform. As you will see in the coming photos
and articles, these items can play well with a classically styled boat.
 We
had been entering the boat with a ladder attached over the transom. The ladder
was removable and would fit into two clips at the top of the transom. Putting
the ladder in and removing it every time we picked up a skier was a hassle.
The ladder was in the way for waterski and wakeboard storage and was causing
its share of damage to the boat. While the ladder was huge improvement over
simply hoisting ourselves over the sides (not easy at all), we wanted a swim
platform as we had seen on competition ski boats.
We
had been entering the boat with a ladder attached over the transom. The ladder
was removable and would fit into two clips at the top of the transom. Putting
the ladder in and removing it every time we picked up a skier was a hassle.
The ladder was in the way for waterski and wakeboard storage and was causing
its share of damage to the boat. While the ladder was huge improvement over
simply hoisting ourselves over the sides (not easy at all), we wanted a swim
platform as we had seen on competition ski boats.
This photo shows our daughter, Jessie coming up the ladder as it was mounted
over the transom.
Designing the swim platform
The requirements for the platform design were:
- Fit with the curves of the Riviera. This meant it would
have to be curved accordingly.
- Fit with adding spray rails / bumper guards along the rear cockpit.
The amount of tumble home in the hull makes it hard to protect when rafting
together with other boats. The spray rails would protect the hull from dings
and dents.
- Be easily removable. The boat can't be moved in and out
of the garage with it on. The platform will come off for the winter as well
as any refinishing work
- Low maintenance. This lead to using Ipe for the wood and
stainless mounting hardware
- Strong. It needs to support at least 500 lbs. That is 2
large skiers / boarders and equipment with minimal deflection.
- Hand grips. Hand slots are very nice for getting on the
platform and eliminating the need for another ladder under the platform
- Roomy Having 1 or 2 people on it and putting on a board
or skis requires some room. The overall size of the platform is approximately
69x20 inches
- Near water line height We wanted it low to the water so
it would not interfere with the lines of the boat while underway and make
entry easier
The search for hardware
The next step was coming up with hardware to mount the swim platform. It had
to look good, be quite stiff and be removable. After scouring the web, posting
queries on rec.sport.waterski, etc., I was a bit disappointed. Basically either
I could:
- Order replacement OEM hardware (e.g. from Mastercraft or
Correct Craft) and make blocking to allow for the transom angle differences.
This looked like about a $260+ option.
- Go with permanent triangular brackets . These were fairly
ugly and the non-removability was not good
- Make full custom brackets. Not wanting to have to weld
aluminum or stainless, this was not a very attractive option.
- Adapt / modify something else. After digging around at
Kendor Marine (local marine parts and salvage parts dealer), I found some
solid stainless heavy duty bimini top hardware pieces that looked like they
would work. I do not have a manufacturer name or part numbers. Like many items
at Kendor, they were unlabeled. If you need some, as for the "heavy duty
bimini top hardware".
The bimini top brackets are a 2 piece assemblies that are made to mount to
a flat surface and then hold onto a 1" diameter tube. The tubular end swivels
in the rougly U shaped bracket. A screw with a shoulder is the pivot pin. The
shoulder prevents the threads from damaging the mating swivelling tube piece.
These are fairly heavy and solid stainless. Some other units were merely plated
zinc or Zamac which I thought would surely break under the loads that I would
apply.
The forward edge of the swim platform is attached to the boat in 3 places.
There are also 2 diagonal supports that hold up the outside edge. To attach
the forward brackets to the platform, I had to make three metal brackets form
1/2x 1" stainless. These pieces were notched to mate with the brackets
at a 5 degree angle. This "straightens the alignment to compensate for
the curvature of the transom. Note however, that the castings are not terribly
precise and each had o be machined slightly differently for a snug fit. Once
they fit, the pivot hole was drilled. Each bracket is held onto the swim platform
by several 2" #12 wood screws. The brackets are drilled and countersunk
to provide a nice smooth look. The brackets were finally belt sanded to remove
he mill scale and give them a nice brushed look. The only stainless bar stock
locally available was #304. This stuff is terrible to work. It work hardens
easily and is very tough on milling cutters and drill bits. The side brackets
are 6" long and the center one is 12" long. They really could all
have been the same length.
The diagonal braces are 1" stainless tubing and are approximately 14.5"
long. It is easily cut with a standard plumbing tubing cutter. After final assembly
and fitting, there are small set screws that lock everything together.
Total cost for the hardware including replacement bits was about $160
Constructing the platform
The platform is made up of parallel 1x4" (0.75x3.5" net) slats for
the top and then 1x4" support pieces arranged roughly perpendicularly underneath.
The construction is very simple lap joints, which raises concerns about rigidity
and structural integrity. At each support point, there is a slat that runs the
width of the platform. I did not want a support simply fastened to the top layer
and all of the fasteners then held in tension.
There are seven front to back support slats on the bottom. They are arranged
with two at each outside edge, one in the center and then one on each side ,
approximately 25% of the way in from each side to mount the diagonal braces.
The slats are spaced 1/4" apart to allow for expansion and for water
to drain off. The finger slot is created by spacers strips that are 3/4"
wide and have the same 1/4" spacing between the planks. This leaves a new
finger slot size of approximately 1.25"x12". This is easy to grab
and wide enough to prevent fingers getting trapped, which may occur if the slot
was too narrow. I am not sure if this a real consideration, but the newest ski
boat swim platforms no longer have finger slots.
The two layers are held together with 3M 5200 and #12 1.25" flat head
stainless wood screws. Screwing it together was provably the hardest part. The
pieces need to be clamped together as the 5200 is very viscous and does not
easily compress evenly for full contact. The Ipe is VERY hard and requires good
pilot holes and countersinks. It can split near the ends if the pilot is not
right. At each board junction I used 2 screws, placed diagonally across the
joint to minimize the chances of splitting.
The area between the lower layer support slats is filled at the rear edge with
blocks. This gives the appearance from the edge that the swim platform is a
solid 1.5" thick piece. The lighter appearing pieces on the lower layer
are the infill. The darker pieces are the ends of the cross support slats.
The sides are curved to extend the contour of the side of the boat. The piece
removed from the front cockpit deck frame was used to set the curve. It was
handy and looked about right. The sides step in about 1.5" in 18"
The back is curved slightly and the curve starts about 1/3 of the way across
and cuts off about 1.25" at the outside edges. There are really no critical
dimensions. Play with the layout while it is sitting on the bench or floor until
you have something pleasing.
The curves were cut on the band saw and with a sabre saw. The edges were planed
and scraped smooth.
Scribing and mounting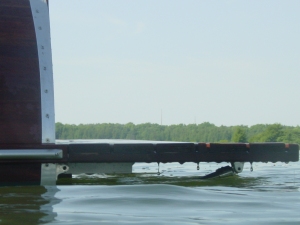
Once the platform was assembled and then brought up to the boat. Temporary
3/8" spacer blocks were laid on the exhaust ports to support it above the
exhaust. I did not want it permanently resting on the exhaust ports or rubbing
against them. The outer edge was held up by a piece of plywood clamped vertically
in my Work Mate. This setup was quite stable and then allowed me to scribe a
line along the forward edge to match the boat transom. A spacer was used with
a pencil to mark the scribe line on the platform. The scribe marking spacer
was cut to width so that the line ended about 3" in from the ends. This
means that the very ends of the platform are flat (not perfectly conforming
to the transom), but has the advantage of avoiding small points that would break
off over time. The curve was cut on the band saw and then scraped.
The forward edges were routed with a 1/8" round over bit. This approximately
matched the edge round over of the planks. The rear edge was routed with 1/4"
round over bit. The sides were left square for the moment to make alignment
with the spray rails easier.
The assembly was again brought back up and braced in position. The outer brackets
were temporarily clamped on and the holes were marked on the transom. The outer
brackets holes were then drilled and sealed with epoxy. The brackets were bedded
in 5200 and through bolted. The alignment is such that the bolts passed though
the transom plywood and the curved interior frame pieces. This meant that interior
blocking was not required. The center bracket position was simply drilled and
screwed in place. It was not through bolted as it was not accessible on the
inside without removing the gas tank (which was still full for the winter).
I like the idea of through bolting as it is easy to swing the swim platform
into boats, docks, etc while turning and did not want it to come off. The brackets
were screwed to the underside of the platform with #12 2" wood screws and
bedded in more 5200. Did you know that 5200 also makes a nice screw lubricant
to assist in driving screws?
 The
angle brackets were screwed in place both on the platform and on the transom.
The brackets on the transom are screwed through the transom into some very substantial
interior framing and are simply held with #12 3" screws and bedded in 5200.
The
angle brackets were screwed in place both on the platform and on the transom.
The brackets on the transom are screwed through the transom into some very substantial
interior framing and are simply held with #12 3" screws and bedded in 5200.
This left photo also shows the angle bracket and the top center mounting bracket
as well.
The right photo is another view showing the cross piece that the diagonal bracket
is mounted to as well as more clearly showing the infill piece at the rear edge.
 This is a shot of the same bracket as viewed from the underside. These are
"Heavy Duty Bimini Top" brackets.
This is a shot of the same bracket as viewed from the underside. These are
"Heavy Duty Bimini Top" brackets.
These two photos show the brackets I made to mount the platform to the transom.
The longer bracket is in the center. The whorter bracket is for the left edge.


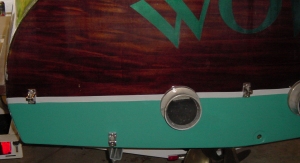
Here are a couple of shots of the "bimini top" brackets mounted on
the transom. The pieces shown above fit into them to hold the swim platform
on.

Spray rails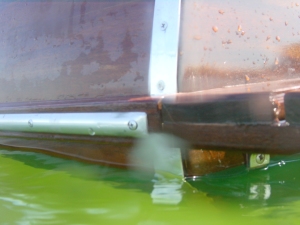
The spray rails are cut from a 2x4 piece of Ipe (1.5" thick net). They
are approximately 1.25" wide at the front and 1.75" wide at the back.
They are scribed to fit the hull. This fitting took about an hour each as the
sides of the boat curve in both the horizontal and vertical directions. Hand
plans and scrapers were used. A curved scraper was very handy in dishing along
the length of the piece to match the vertical curvature (tumblehome) of the
sides. The Ipe is extremely stiff and there was really no pulling the gap shut
with screws.
The spray rails were through bolted and fender washers were used on the inside
to avoid crushing the okoume plywood. The spray rails were bedded in Sikaflex
(they may have to be removed some day). The bolt holes were plugged. With the
mahogany colored Sikaflex, the joint line is nearly invisible.
At this point the final fitting of the outer contour was done by planing the
spray rails to match the swim platform. The edges of the spray rails and swim
platform were then routed with a 1/4" round over bit. This photo shows
the joint between the swim platform and the spray rail.
Stainless half oval trim was applied for wear resistance. The cut ends were
beaten flat (big hammer and steel plate). Next, they were filed to shape and
then sanded to with 600 and 1000 grit emery paper and then polished. The half
oval pieces were screwed onto the spray rails. I chose not to put any on the
swim platform.
Finishing
The entire surface is scraped smooth. All the corners are rounded over as well.
The wood was coated with a couple of coats of Penofin. It is recommended by
a friend of mine who works for the importer (http://www.ironwoods.com/). I have
used this on outdoor Ipe furniture in the past. It makes for an amazingly good
color match to the mahogany.
In Use
My wife says that the swim platform is the best addition I have made to the
boat. It is so easy to get people in and out of the boat with out having to
fool around with the ladder. We gained storage space, reduced hassle when changing
skiers / boarders and reduced damage to the boat. Additionally. when we anchor
out in the lake, the ladder would often come loose due to wave motion. This
required that it be tied on or a ski handle draped over the tow eye. No more
problems with that.
There aren't photos of the actual construction process. I was in a bit of a
rush to get the boat in the water. With everything that needed to be done this
spring, platform, pylon and refinish. As a result, I completely forgot to shoot
anything until we had the boat in the water.
The photos on the boat in the water were taken with a Sony digital still camera
and underwater housing. We use this camera extensively while on the water. The
movie clips are great for troubleshooting new tricks and teaching beginners
what is going on with their deep water starts.
Site Map
Copyright 2003, 2004 Mark Bronkalla
This page last modified 5/18/04