| Finishing Board trim
Walnut edging was used for the "finishing board". The edge of the deck was rabbeted 3/8" deep (in from the outer edge) and 7/8" high. This took multiple passes. At the rear, the curvature is such that the router bit will rest on the bearing screw, rather than the ball bearing. Place a strip of cloth tape on the hull to protect the finish prior to routing. At the rear the rabbet must be enlarged with a straight cutting bit. Clamp a fence on the deck to guide the router. The rearmost end of the rabbet was 1.25" wide. Doing it again, I would make the whole rabbet another 1/4" deeper (horizontally into the deck). Make your passes such that you are "climb cutting" to avoid lifting the fiberglass. If the fiberglass does lift in spots, it can be glued back down. The results can be invisible, but is is difficult getting the resin into the entire lifted area without lifting more. Any bubbles will show forever. The first strip is installed in the rabbet and varies in width. Allow it to protrude at least 1/4" beyond the hull and up to 1" at the bow. It will be planed later to match the curvature of the hull. Do not plane or saw to match the hull contour yet. This board has to be able to be trimmed to blend the hull and side contours together. If you make it too small, you will cut through it, into the plywood below when you fair the curve
|
||
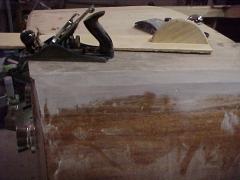
Rabbets ready for filler strip |
||
|
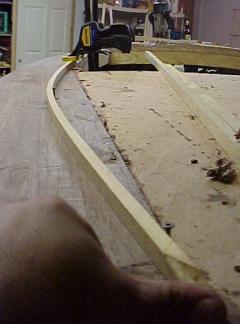
Filler strips fitted in place at transom and along the side. Clamping is difficult due to the curvature. 6 screws were used as well and the holes plugged |
 |
|
|
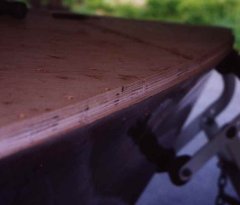
Top finishing board The top finishing boards were made of 6mm thick walnut of approximately 4" width and 4' length. 2 rows are used. At the extreme curvature in the bow, an additional piece of up to 2.5" width was required on the outside edge. The pieces are laid out for best fit and the ends are cut to bisect the angle between adjacent lengths of walnut planks. The pieces are then glued down and stapled in place. At the outside edge, spring clamps can be used to clamp to the previously installed edging. The epoxy was tinted with either walnut flour or raw sienna universal tinting colors. 1-2 drops per pump of epoxy provided a reasonably close match. High density silica was used for the balance of the filler
|
Here the walnut is installed and the side is sanded flush with the fiberglass. |
|
| Trimming the finishing board
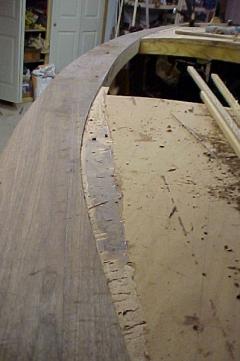
Trimming the inside edge of the finishing board requires several techniques. The width of the board varies throughout its length (yes check the plans), it is flush with the inside edge of the cockpits, and the outside edge is beveled (down at the bow, up at the stern). The cockpit edges are trimmed using a 1/2" flush trim router bit or saw and hand plane. The inside edge is NOT able to be trimmed with a router and guide fence, due to the reasons listed above. In addition the offset is very large leading to fence contact errors being amplified and then gouging the finished edge. Once again flexible battens come to the rescue! The view at the right is from the bow looking rearwards to the forward cockpit on the starboard side. A batten is clamped with 2 clamps at the cockpit edge about a foot apart. There are temporary screws placed at measured points to flex the batten against. A sharp utility knife is used to cut on the inside of the batten. Multiple passes are made to get through the entire depth of the finishing board. It is easier if the cut is enlarged with a bevel on the inside edge (towards the center of the boat). The balance of the finishing board is removed with a router and mortising bit or chisels and hand planes. The silica filler quickly dulls utility knife blades. I would get only about 2 feet cut through before needing to change the blade. Remember to cut "downhill" so that the wood grain drives the blade towards the batten. Conversely, run the router to the right so that it drives away from the scored edge. Glue contact was very good between the layers! Great for final strength, but it made removal of the waste difficult.
|
 |
|
 |
||
| Decking planks
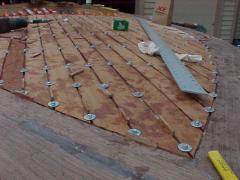
8/4 Mahogany planks were ripped into 5mm thick strips. This is the same process used on the hull. 33 strips were used. This is half as many as were needed for the sides of the hull. The centerline of the boat was decided to be a gap (rather than a plank). The centerline was marked and sheet metal screws were inserted along the line to act as a reference and later as clamps. Spacers were made by ripping 4mm plywood scraps into 2/3" wide strips and cutting them to ~ 1.5-2" lengths. Each piece was placed on the deck, spaced and then marked for the cut angle. The cut was roughed out and then trimmed on the disk and belt sander with a 60 grit disk and / or 80 grit belt. The work progressed quickly. The forward most pieces had straight cuts. As we progressed down the side, the cuts became curved. Cut off straight but long by 1/8" and the sand to the curve for final fit. The pieces are temporarily fastened in place until a suitable number for gluing are assembled. In the bow this was 8 on each side of centerline. Basically you want to have enough for a good run at gluing, but reserve the areas at the outside edges which will have long nearly parallel cuts for a second pass. When doing the assembly and clamping, the screws are at 12-16" spacing. After the entire area is in place, additional rows of screws are added so that final distance between screws is 6-8". Remove the spacers at this time. The weather is finally nice and we were able to do much of the planking with the boat pushed outdoors. David is adding more clamp screws. The heat of the sun helps the glue cure quickly and allows for 2 glue-ups in a day. The rear edge is clamped with hand spring clamps. Remove the screws (and any forgotten spacers) as the glue is at the rubbery stage. DO not let it fully harden or the screws may be locked in place and the washers glued to the top. You do not want to risk tear-out of the faces or edges. If any tear-out occurs, use super glue to put the sliver back in place. |
Decking shown with #8 x 3/4" sheet metal screws and 3/4" diameter fender washers. Spacers are placed across the gaps rather in the middle of the planks to provide a better match of the edges. |
|
Decking with spacers and screws |
||
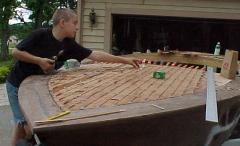
David is adding more clamp screws. |
||
| Next: Decking Fiberglass | ||
| Home | Top |
|