|
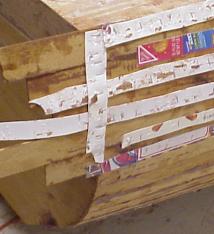
Mahogany Planking The bottom is planked with 6" wide strips of plywood run lengthwise. These stop short of the bow as part of the area below the chines will be visible above the water line. This area is to be covered in mahogany. Since this is the final layer, stapling strips are required. Stapling strips are thin pieces through which you fasten the staples to minimize damage to the hull as well as make the staples easier to remove. First, I tried carton strapping. In theory, pulling the strapping up pulls out the staples too. This can work, but often tears as you remove the tape and staples. The staple crown marks also telegraph through strongly. If you use this technique wear strong gloves while removing as the strapping easily cuts hands as will the odd staple that completely comes out with the tape and lies in ambush for your finger as you re-grip to pull up the next few inches of tape. |

Here are the strips on the side at the transom. Note the vertical strip. In it there are extra staples to ensure the that transom edge joint is pulled tight against the curvature of the side. Also note the stapling strips run down the joints of the planking. |
|
Paperboard (cereal boxes, etc.) ripped into strips works better as it provides a cushion. The drawback is it does get glued down, especially if bridging a seam. It is then a real mess to clean off. The paperboard quickly clogs a plane or sandpaper. The latest thing is to cover the paperboard strips with carton sealing / packing tape. This works great! It removes cleanly and the tape has less friction, which makes sliding a screwdriver underneath the staple crown easier. Making the strips is one more job for the kids. Another that has mixed results is the plasticized packing paperboard sheets that come with Agfa x-ray film. This is nicely cushioned and is by far the easiest for staple removal, but does stick to the epoxy. Be careful when pulling up as splinters of mahogany may also pull of with the strips. Mahogany Strips Due to the outrageous prices for deck strips, I decided to rip my own. I had the rough planks planed and then thickness sanded at the lumber mill. This resulted in 1 3/4 " thick x ~12" wide x 10' long planks. The smoothly sanded faces will then become the edges between the strips. I tried ripping on the band saw, but this was futile. There is just not enough power and it is very difficult to steer the planks through. Next was the table saw. It is set up with a Freud Thin Kerf ripping blade. The ends of the planks are supported on roller stands. The ball type roller works much better than the long conveyor type roller. I just got the rollers and wish I had bought them years ago! (Yes, more project tools). The saw drifted on the floor as the planks were pushed through. Screwing a stop strip into the concrete floor then held the saw securely and the cut quality improved dramatically. Constant feed rate is very important with thin kerf blades. If you bog down and then release pressure the blade "rings" and you get a wide kerf at that point. It proved to be much easier to rip the boards if they are initially ripped to about 6" wide and then into strips. Remember, the full size planks are HEAVY. Have small wooden wedges ready to put in the kerf. A small amount of case hardening or stress in the plank will cause the kerf to close and bind on the blade. There is tremendous pressure exerted this way and you cannot hold the cut open. Ripping of the strips is done with the guard off as the strips are only 4mm thick (to match the plywood). Be careful!. Use push sticks and have your helper pull through the thin pieces. Ripping the 65 strips took ~3 hours. It looked like an orange snow storm had hit! Even with the dust collector on, there was sawdust everywhere. This is definitely respirator time. |
|
| The best way to staple is to run the stapling strips down the seam
between planks and staple 2 plank edges at once. This results in fewer
holes and the glue at the seam reinforces the wood against crushing when
the staple is pulled.
When cutting the strips to length and then placing on the boat, work to minimize accumulated errors. Cut every end!. Do not assume that the ends are square! I use a power miter box, and it is difficult to get to zero exactly. With the following technique it is not required! Look at each strip and determine the good (top) side. Now take to the saw with all facing good side up and cut the right end with the strips to the left of the saw blade and then cut the left end with the strips to the right of the saw blade. From this point on, DO NOT flip or rotate. When placed on the boat with "right" and "left" ends abutted, there will be no gap, even with some angular error in the saw setup. If you flip a board over the errors will accumulate rather than cancel out, and a gap will show. This is the same technique that is used in laying out a hardwood floor. |
|
| Next: Chine fitting of planking | |
| Home | Top of Page |