After hand cutting a few slots for the battens I decided there had to be a better way. There are ~150 on the boat. In addition, I had used stainless steel staples in fastening the gussets. The SS staples dull a hand saw or sabre saw blade in a couple of passes
|
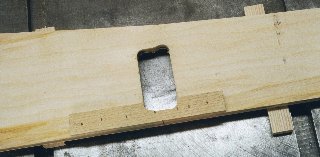
Router Jig top View The router jig is based on a scrap piece of 1/2" plywood. Joint one long edge square. Use a scrap pieces as fences / stops. Position the first piece perpendicularly to the edge, glue and fasten with brads. Place router on jig against fence and also a piece of the batten stock. Mark this width as a
line perpendicular to the jointed edge. Now subtract the diameter of the router bit and mark a new line. This is now where the second fence is placed. |
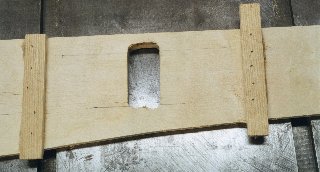
The bottom fence shown above was later kerfed in six places to allow the jig to more readily curve to match the bottom contours. |
|
Bottom of the jig. A small fence is added for stiffness and for occasional use. Most of the cuts are frame side at only one end. Note: The fence parts are held on by thickened "super glue" cyanoacrylate . This is plenty strong and allows immediate use. Purchase at woodworkers stores or hobby shops in 2-4 oz bottles. |
 |
|
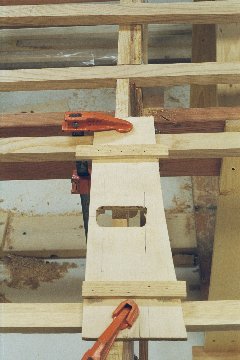
Jig clamped to a frame Now it is ready for a cut. Using 1/2" plywood allows enough flex to conform to the mild contours on the bottom. It is not flexible enough for the sides and those batten notches must be cut by hand.
|
 |
|
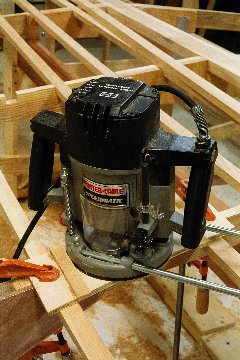
Router on jig ready to cut. Note a smaller unit such as a Porter Cable 690/691 would be adequate and much easier on the back!. I use a 1/2" solid carbide end mill in the router. The end mill lasts a long time and will cut the staples with ease. These should be purchased from an industrial supply house as there, they will be ~1/2 of the price charged for a "1/2 inch Up-cut spiral carbide router bit" at a woodworking or hardware store. I paid $26 for mine at Waukesha Industrial Supply. Note this is for a replacement - the first one lasted for 7 years of furniture building, and would have gone longer if only I had plunged up before setting the router down on the concrete floor. Also note, this is not completely operator error, as the threaded nuts visible on the left side of the router walk themselves down, and if you are not careful, will limit upward motion (no plunge up). |
 |
| Next: Sanding | |
| Home |