| The Challenge
Two of the things that give the boatbuilder nightmares are what to do when you MUST modify the plans to suit your specific needs and also the "joy" of cutting big holes into your beautiful creation. The next few columns cover both of these topics. My first "big hole" was the angled hole for the prop shaft which kept me up nights worrying about it. The other one that caused lost sleep was the engine hatch. The hatch and its framing is what I cover this month in some detail. This column is specific to the Riviera and Monaco, but is applicable to any of the other inboards where a hatch must be cut in the deck. The method used results in a beautifully fair and perfectly matched hatch. The downside is the traumatic step of taking a circular saw and sawing it out of the finished deck. As a further point, not everything went smoothly. I made some mistakes, but was able to recover and cover my tracks. It did cost a few evenings of time in the process. The 5.7 L engine is the common choice for this boat. Unfortunately, it does not fit the plans. It is too tall and depending on the transmission, it may be much too tall. To minimize the height, I went with the PCM 1.23:1 transmission. This provides an 8 degree down angle, so the engine only needs to be mounted at an 8 degree angle, to provide the final 16 degree prop shaft angle used with the recommended strut. In addition, the MPI (Multi-port Injected) version is shorter than either the carbureted or throttle body injected versions. Now the deck must be raised to be able to enclose the engine. One of the other Riviera builders, Bill Yonescu, cleverly used a single hatch opening. This has a couple or benefits: Easier access to the engine, and reduced deck height due to not having center hatch edge braces running over the top of the engine. The lack of center braces allows the deck to be ~2-3" lower than using the traditional two hatches. After looking things over, I decided on this approach as well. Based on my initial calculations and fitting of the engine I figured I needed ~2" extra deck height. |
|
| Install the engine
The center frame was cut to allow engine installation. The initial cuts are only large enough to fit the engine through. The ends are re-cut once the final hatch opening framing is figured out. Get the engine into final alignment and verify that the engine mounts are roughly centered in their adjustment range. This is your last chance to do it the easy way. Later, once the deck framing is in place it gets MUCH harder to do the alignment. Do not start the engine hatch area framing until the entire drive train installation is complete. I was lacking a transmission shaft flange and proceeded ahead anyway - and paid the price. (I thought it looked close.) |
|
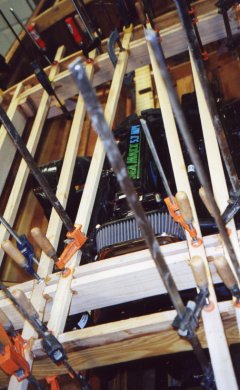
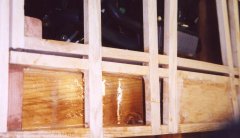
| Raise the deck The deck needs to be raised to clear the engine. A curved and tapered piece was glued on the forward frame. This was cut out of the scrap saved from when the frame was originally cut out and yielded a very nice final match in grain and curvature. The top of taper curves were made by using another scrap piece cut off from an adjoining frame and drawing the curve from the center point to ~4" on each side. This was then glued in place. The front was raised ~1.25", the rear 0.5". By tapering the raised portions, the sheer line does not change. The engine deck merely gets more arched than the plans suggest. The discontinuity in the "fairness" of the deck is disguised by the cockpit openings and the seat backs. Do not worry about the frame that was cut for engine installation at this time. Small tapered wedges will be added after the hatch opening is framed out. Hatch opening sides The hatch sides are framed next. These pieces define the width of the hatch opening. They run the entire length of the engine compartment. The hatch sides are ~4" tall. The non-obvious point is that the sides should not be plumb. They must be perpendicular to the deck, or even slanted slightly, with the bottoms tapered inwards toward the engine. If they are installed plumb, the hatch will not be able to open once the hinge is attached, because the lower edge of the hatch will catch on the opening. (If you are curious, mine were plumb and the hatch would not open! It did get fixed and the fix is not noticeable.) Corner blocks are used to reinforce the joint (triangular pieces shown in the photo). Since all of the hatch and hatch framing joints are butt joints, glue blocks provide the necessary strength and rigidity. This is much easier than having to rabbet the corners or make a box or finger joint. Hatch opening ends The hatch ends are sawn with the curve matching the nearest frame (trace from the frame). Saw out both the hatch opening ends and the hatch ends as a pair. Install the support blocking and then the hatch opening ends. The blocking helps greatly in getting the pieces into alignment as well as strengthening the joint. Set the rear hatch end slightly higher than the frame. This will allow it to be planed down to deck level during fairing. Hatch outer frame Now the hatch frame is made and fitted into place. I used scraps of 6mm (1/4") plywood to shim the hatch pieces away from the deck opening. Cover the shims with tape to prevent them from getting glued in place due to dribbles while decking. Screws are driven through the hatch, shim and deck frame to hold the hatch in place. Place them angled slightly upward so they are easily removed once the battens and deck are in place. The bottom of the hatch corners should be flush the bottom of the frame. Corner support blocks are added underneath. These blocks will bear the weight of the hatch and people climbing over it. Installing these blocks prior to the hatch frame eases alignment and makes assembly easier. Use tape on the blocks to prevent the hatch from getting stuck to them due to dribbles. I mounted the hatch sides first and then the fore and aft ends. The inside corner was again reinforced with a corner block. The corner block was simply glued in place after the initial butt joint had hardened. It would have been in the way during initial assembly. The corner block is partially seen as the small square near the orange clamp. Tapers are added on top of the deck frame pieces to match the height of the hatch opening frames. Place marks on the cockpit opening to show the gap between the hatch and the deck frame. You can use these marks later to set the saw guide and the angle of the blade. A 6mm gap is not that much wider than the saw blade (1/8" ~= 3mm). Installing the battens Lay out the battens to approximate what is given in the plans. The battens are splayed to clear the engine in the center. Once the layout looks good, cut the batten notches and fit the battens. Cut the notches carefully as almost all of the joints will be visible either from the rear cockpit, or when the hatch is open. Note, the center frame piece that was cut out when the engine was installed is not replaced. With enough battens and the strength due to the curvature of the deck, it is not necessary. There is no bounce in the final hatch, even with two of us stepping on it! Clean up the squeeze out and make nice fillets on the joints you can reach. Don't worry about any in between the hatch and frame, that will get sawed and sanded off later, when you cut out the hatch. Additional blocking was added to the forward deck framing to accommodate a future ski pylon. A large block at the bottom spans the width of the hatch opening. I small one at the top spans the center batten opening. These should give enough rigidity when adding a pylon later. Redoing the engine mounts If you carefully complete engine and shaft alignment before deck framing you can skip this step! The prop shaft flange finally came! When it was time to align the engine to the shaft the engine angle was wrong. The front of the engine was too high, and there was not enough downward adjustment available in the engine mount! The front of the engine had to be lifted up with the hoist. Yes, it is trapped in the deck, and the chains had to be run between the deck battens, The mounts were removed and the engine bed mounting points were drilled out and chiseled down 1.5". The mounts were reinstalled and now everything lines up. It takes a lot of motion at the front of the engine to move the back a little. The front engine mounts have limited adjustment range and the rear have plenty. Fairing and decking Fair the deck frame and apply the decking to match the rest of the boat. I started the plywood sheet for the decking on the first straight batten. This placed it slightly off center but the seam was now over blocking. In the end, this area needed some additional fairing as it was slightly humped due to the upwards pull of the plywood. The hump was well under 1/8" at its worst.
|

Modified forward frame showing the added upper bow.
Engine hatch framing showing battens and raised frame piece (foreground).
Engine hatch and deck frame corner blocks.
A better view of the center battens
Hatch corner block
Blocking for future ski pylon |
| Next: Decking | |
| Home | |