| Center / Hatch section
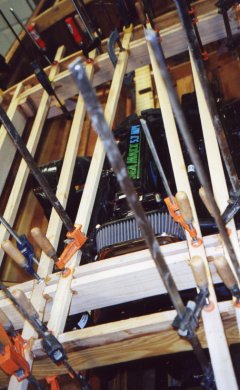
The hatch is completely framed in place. Plywood spacers are installed and screws driven through the frames to hold everything in alignment. The plywood is 6mm and spaced 1-2" down from the top so that the spacers do not get glued in place. The hatch will be sawn out once the decking is completed. Due to the non-standard hatch and batten layout, this requires that the plywood layer also be non-standard. Rather than have the panels meet over a strong-back in the center, the first piece is placed over~60% of the width, such that the longitudinal edge lands over a batten. The engine is draped with plastic prior to gluing. |
 |
| Plywood decking layer
The plywood (3/8" - 9mm) is laid in place and the outline is traced from underneath with a pencil and a spacer block. The spacer block gives a uniform lip on the plywood to allow for positioning error as well and trimming. Cut out the pieces with a sabre saw prior to gluing. The cut out pieces are easier to handle, leave working room in the cockpits and conform to the deck curvature better. The plywood is clamped and temporarily screwed in place. No more staples! I used 3/4" dry wall screws (1" may be better). Pre-drill the holes in the plywood after the pieces are in place. If not predrilled, the screws will not be able to pull the plywood sown tight and will probably strip out in the battens. Use 3-4" spacing on the perimeter and 6" spacing along the battens. My son provides the downward clamping force (kneeling on the deck) while drilling the holes and screwing. He also puts the screws in the holes. It is amazing how much quicker this is than stapling - especially during removal. Crawl underneath and smooth the squeeze out into neat fillets. Around the engine, pretzel shaped contortions are required, but will pay off in easier finishing later. Pay special attention to the underside of the hatch area. This will be visible to spectators later. Typically, one panel (most of a 4x8' ) sheet is done at a time, which consumes all of my clamps and allows just enough time for underside clean-up. My schedule has been apply the deck sheet in the evening and then remove the clamps, screws and clean up the edges first thing in the morning. At that point the glue is set up but not yet rock hard, allowing easier work with chisel and planes. The rabbet plane is again most useful for edge joint clean-up. |

Here is the deck with the walnut trim "finishing boards" in place, prior to trimming. |
| Stern deck
Remove the gas tank for access to the underside cleanup. This area is covered with two of the cockpit opening cut-offs. Covering the complete deck took 3.5 4x8' sheets of plywood, but I used a layout different than that shown in the plans. |
|
| Dash
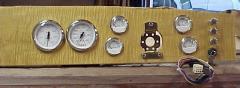
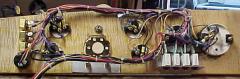
The dash is a piece of curly maple that is fitted to match the curvature of the deck. Brackets are added to give rear clearance for the instruments as well as an ~20 degree angle to the installed dash. Connectors are installed to allow easy removal of the dash assembly. The view of the front of the dash shows the gauges, switches and steering mounting plate. The rear view of the dash shows the same plus the 4 circuit breakers. The breakers are mounted on a piece of aluminum angle below and behind the speedometer. The steering bracket has a back-up plate and washers to spread the load. The dash is installed with aluminum angle bracket on the left rear side. It is screwed down to the center bracket with 2x #12 2" screws underneath the steering trim cover. The right side is fastened with an aluminum plat which is let in flush with the top of the right bracket. No screws are visible from the front. The dash is removed and set aside until the varnishing is completed.
|
 |
 |
|
|
|
| Next: Decking 2 | |
| Home | Top |